
A Pallet Planter Box… true {love}.
The inspiration for this project started with this picture:
 {source}
Funny enough, I think the pallet project being featured in that picture is the coffee table. HA! Well, I saw beyond the coffee table and fell in love with those planter boxes. I thought they could easily be made with pallet wood, and why not give it a try? Of course that required a pallet, which meant I needed to get my hands on one. Mission accomplished with a little dumpster diving drive by in which I scored two. Woo Hoo!
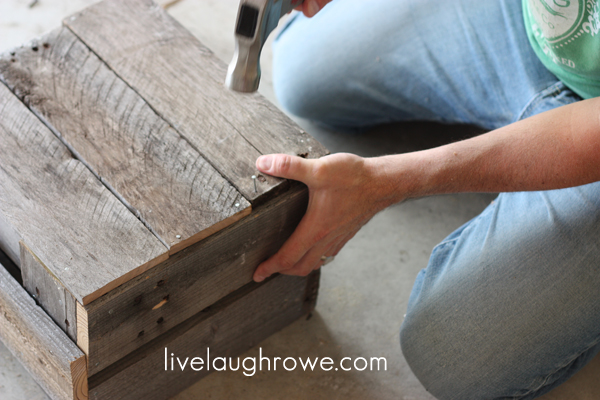
Grab your hammer, nails and mitre saw!
Let’s make a Pallet Planter Box.

Supplies:
Pallet wood (or wood of choice)
Mitre Saw
Hammer
Nails
(2) 13-1/2″ boards
(11) 12″ boards
(4) 9″ boards
*The width of your boards will vary on your pallet.
Here is a hand drawn illustration (by my hubby) to help with understanding what to do at each step of constructing the front and the back pieces of the planter box.

step one. Take two of your 12″ pieces and lay them horizontally parallel to one another. Whether they’re flush or there is a slight gap will depend upon on the width of your pallet boards.
step two. Take your other two 9″ pieces and place them vertically on top of the other boards (one on each end).
step three. Now take the 13-1/2″ board (the piece I refer to as the brace, although it’s not technically a brace) and place it horizontally parallel centered to the top and bottom of the bottom pieces.
step four: Repeat for the back piece.
For the sides, you’ll want to grab two 12″ boards for each side. Take those boards and nail them into the ends of both the front and the back pieces we’ve already put together.

Once those are attached, you’ll nail your three remaining 12″ pieces on the bottom.

 And you’re done!
A rustic, weathered pallet planter box!
Here’s a tip. After cutting the pallet boards, the ends are not as weathered. You can see that in some of the pictures above. I took some black crafting paint, watered it down and rubbed it over those spots with a rag. After it absorbs, you won’t know the difference.
 p.s. Be sure to swing by and check out my Pallet Serving Tray too!
 Be sure to visit with me here too:
Facebook | Instagram | Pinterest | Twitter | Google+


Danni Baird says
Kelly I love this! I also love that you gave a diagram! Thank your husband for me! My pallet is still leaning up against the back of the house just waiting for me to do something with it! Thanks for some morning inspiration!
Kelly says
Thanks, Danni! I’ll be sure thank my hubby as well… diagrams can be super helpful! Put that pallet to good use and make yourself a couple of these 🙂 Happy Monday, friend. xo
Jenny says
I love it! I love how rustic it looks. The tutorial is fabulous as well.
Kelly says
Thanks, Jenny! I think the rustic, weathered look is fabulous too! Have a lovely day. Hugs.
Jenny says
Those are the coolest! I love them!
Kelly says
Jenny, you’re the bestest! Thank you so much. Have a wonderful week, friend. xo
Liz says
I love a good pallet project even though I haven’t yet tried one. I guess I’m storing them all up in my head for whenever I actually find a way to get a pallet or two home. Thanks for the idea!
Liz
Kelly says
Thanks, Liz! Pallet projects are something fun and different… I hope to round up a bunch of pallet projects in the next week or two for even more inspiration 🙂 Happy Monday! xo
Megan says
These are awesome! I love that they are weathered and your choice of flowers look great in them. Megan
Kelly says
Thanks so much, Megan. The weathered look is perfect, isn’t it… I can’t resist begonias, such a colorful and hardy flower.
Amy says
Love it Kelli! Great work with the tutorial and awesome photos! Thanks!
Have a great day!
Amy @Sugar and Spice
Kelly says
Thanks so much, Amy 🙂 I was pleased with how it turned out! Hugs.
Kathe says
Your (hubby’s?) diagram makes it look easy enough for even me to give this a try!! I have 2 pallets taunting me to do a project with them. I can see three of these in a line as a centerpiece on the dining table. I would love it if you shared this at my party, You’re Gonna Love It Tuesday:
http://www.kathewithane.com/
Kelly says
YAY! I’m so glad you found inspiration. Thanks so much for stopping by 🙂 Hugs!
Shannah @ Just Us Four says
This looks so great! What a fantastic project! Would you consider linking it up at my Pinworthy Projects Party? I hope to see you there!
Kelly says
Hi Shannah! Thanks so much for loving on my pallet project 🙂 I will do my best to swing by…. so many parties, so little time. xo
Cari says
Amazing! Love this!!! What a great project – especially since it was with the hubby:)
Kelly says
Thanks, Cari! Projects with the hubby are the bestest. Have a lovely week-end 🙂
Kristine says
What a GREAT idea! Great DIY project and you explained it so well! NICE JOB! 🙂 Always enjoy your posts.
Kelly says
Thanks so much 🙂 Hugs!!
Shirley@motivatedmommyoftwo says
This is such a great idea I love it.
Kelly says
Thanks for loving on my pallet project, Shirley! I trust you’re having a great week.
kara says
These are great!
Kelly says
Thanks, Kara! Hugs.
Leslie says
Oops! Sorry about that last post! I love your pallet planters!
Kelly says
LOL. No worries 🙂 Thanks for stopping by and leaving some comment {love}. Hugs!
Claire says
I love your take on the pallet craze, Kelly! They’re so rustic and look fantastic with your flowers (begonias?)
Thanks for the great tutorial!
Kelly says
Thanks, Claire! Yep, I {love} begonias — they’re such a hardy flower 🙂 Have a lovely day!
Lorrie says
These are so cute! You did a fantastic job! and I love the drawing, so easy to visualize!
Kelly says
Thanks so much, Lorrie! I know my hubby will be glad to hear that the illustration has been helpful. Have a fabulous day. Hugs!
Lish says
I love it!! So rustic and I love pallets!!! It’s also an excuse to buy more flowers…hehe!
Kelly says
YAY! More flowers 🙂 Thanks so much for loving on my project, Lish. Hugs to you and the boys.
Julie says
These are cute! There are a lot of pallets laying around my neighborhood due to new construction. I may have to see if I can grab one so I can make some of these.
Kelly says
Girl, what are you waiting for? Go get those pallets 😉 Thanks for stopping by. Hugs!
DJ Remington says
This is awesome! Thanks for sharing!
Kelly says
Thanks for stopping by 🙂
Connie says
Very nice, please link it up with me today at Wow Us Wednesday. Following you linky followers 🙂
Kelly says
Hi Connie! Thanks so much for visiting with me and loving on my pallet project. Have a lovely day 🙂
Elise says
You put these together!? These look great! Nice work. I’m a new linky follower, would love if you stopped by and followed me at http://www.iheartpears.blogspot.com
Kelly says
Hi Elise! Thanks so much for stopping by… my hubby and I did this project together. I will be sure to swing by your blog and say hello.
Laurie says
Hi, I’m visiting from Inspiration Friday At The Picket Fence linky party. Love the box. Anything rustic and you got me. I am now following you.
http://www.laurieslittlebitsofcreativity.com/
Kelly says
Hi Laurie! Thanks so much for stopping by via The Picket Fence. I’m thrilled to have you here — and I couldn’t agree more, anything rustic catches my attention too. Have a lovely day. xo, Kelly
Melanie@MJ says
That is really cute! Awesome job.
Kelly says
Aren’t you the sweetest? Thanks so much, Melanie. xo, Kelly
Debra Kapellakis says
Those are great!
Kelly says
Thanks, Debra 🙂
Christine says
Oh Kelly!! They are wonderful!!! I wouldn’t mind having them myself hehe
Thanks so much for sharing at The DIY Dreamer.. From Dream To Reality!
Kelly says
Thanks so much, Christine!
Melissa says
Love this! I just found your blog! I just rebuilt a fence so I have a TON of old wood….. I think I’ll be making some planter boxes! 🙂
Kelly says
WOO HOO!! How exciting that you already have the supplies! So glad you found me and my little corner of bloggy land. Don’t be a stranger! Hugs.
Bonnie and trish @ uncommon says
Love this Kelly, the rustic look is fab!! Love having you each week at Uncommon! 🙂
Kelly says
Thanks so much, Bonnie! Hugs.
Three Chicks & One Egg says
This is a fantastic idea Kelly! Super easy and looks terrific. I’ve been wanting to make some boxes for my bathroom and I think these will be perfect. Thanks for the diagram – will definitely help when making them! I’m going to pin this!
Kelly says
YAY! Super glad you like my project 🙂 Thanks for stopping by, leaving some comment love and pinning! Happy Saturday. Hugs.
Jenn says
Hi Kelly! What a greqt tutorial! I will be putting this on my craft wish list! Thanks so much for coming out to the party at Clean and Scentsible. I’ll be featuring this tomorrow! Enjoy the rest of your weekend!
Jenn
Kelly says
Hi Jenn! Thanks so much. I’m super excited for the feature as well. Have a lovely weekend as well. Hugs!
Tanya says
So creative Kelli! I love the mix of rustic wood and flowers 🙂
Hugs, Tanya
Kelly says
Thanks so much, Tanya… I’m kinda in love with this project. Simple. Rustic and Versatile 🙂
Debbie says
Loving it! I need to get my hubs to work! Thanks for sharing at Toot Your Horn Tuesday 🙂
Kelly says
Thanks, Deb! Recruiting the hubs help is nice for these types of projects 🙂 HUGS!
Kim S says
Luv luv luv pallette projects! thands for sharing at tip toe thru tuesday!Kim
Kelly says
I love pallet projects too 🙂 Thanks so much for stopping by!
Jess @ Spool and Spoon says
I love these and would so love to have them in my kitchen so I just tried to convince my husband (via email) that I needed your saw. He laughed and refused. I guess I’m not nearly as handy as I dream that I am.
Kelly says
Girl, you are too cute! You don’t have to own a mitre saw, but using a handsaw would be quite a bit of work 🙂 Thanks so much for stopping by. Have a fabulous day. xo, Kelly
Dana {CraftedNiche} says
You’re so clever! These turned out great. I’m officially on the lookout for more pallets!
Angie R says
Love it!!! Featuring you today! 🙂
Aimee - ItsOverflowing says
Featuring you today!!! XO, Aimee
Inspire Me Heather says
Your planter is lovely and great tutorial too, thanks! I’ve got this linked to my planters post too today!
beecraft says
Nice informative blog!!!!!Looking forward to know more………
Laura says
Does one pallet make one planter? Did you have any left over wood? Could you make another planter with the leftovers?
Looks great!
Kelly Rowe says
Hi Laura! The planter will only use portion of a pallet, you will have left over wood. I would think you could get at least three pallet planter boxes out of one pallet, depending on the condition of your pallet. Thanks so much for stopping by!
Jen @ Noting Grace says
LONG time stalker and lover of your blog. I adore these planters and think it’s absolutely genius! I’ve featured this post on my blog and wanted to share the bloggy love! Everyone needs to see what an awesome idea this is!
As always, thanks for rockin’ the inspiration!
Kelly Rowe says
Thanks so much Jen! I really appreciate it. 🙂 I thought a planter box would be a different and fun idea for a pallet wood DIY. Enjoy the rest of your weekend. xo.
Pilar says
This looks so pretty! Finally found something to do with all my small pieces of wood just lying around. Very helpful, thank you 🙂
Louis says
I love diy pallet planter box. I will do one by myself
Gian Carlo says
Nice, DIY pallet planter box. I will make like this to plant strawberries
meng says
I love it! I love how rustic it looks. The tutorial is fabulous as well.