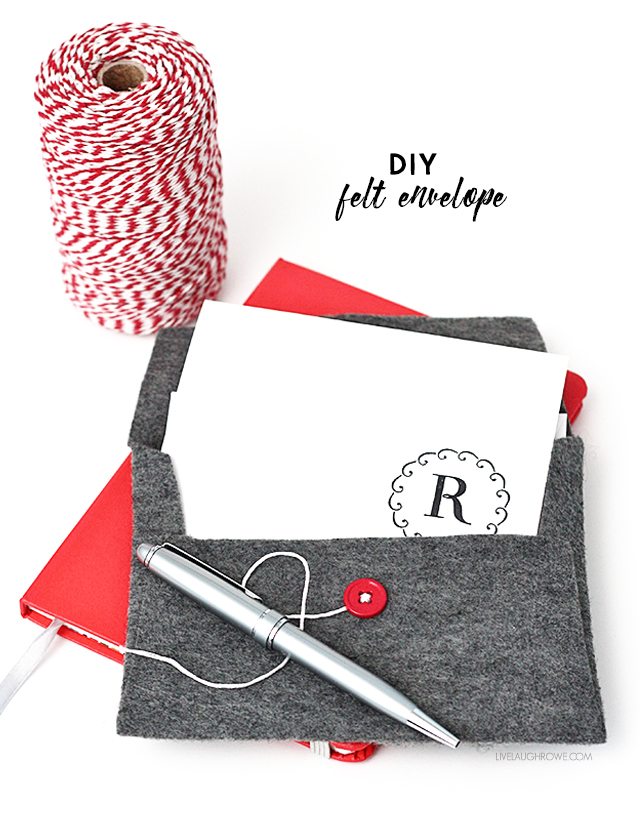
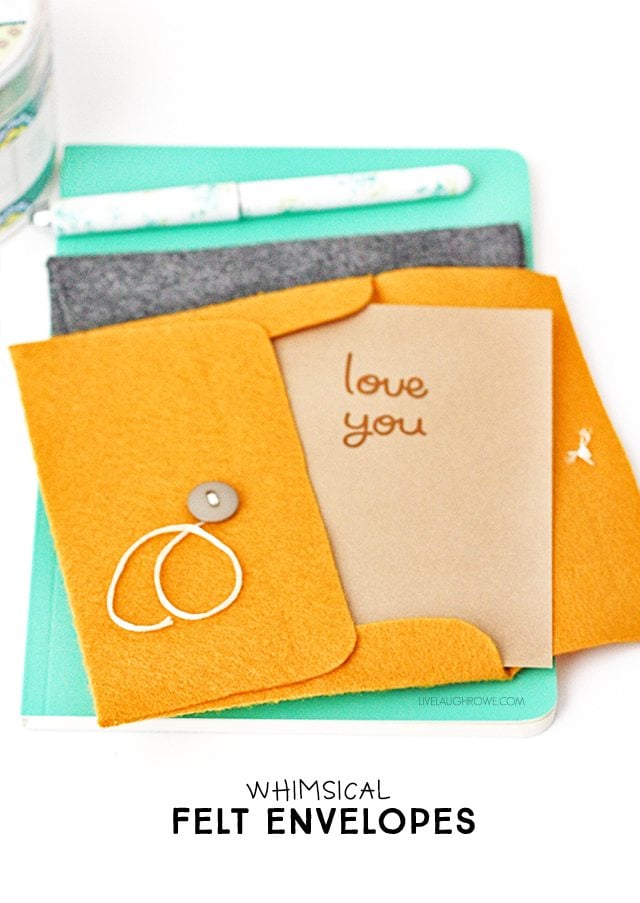
How about another quick and easy felt project? I kinda {love} working with felt. How about you?
I’ve made felt birds, a felt tissue box cover and felt house ornaments. Let’s try our hand at a felt envelope!
 Let’s grab our supplies and get this felt project under way!
Supplies for DIY Felt Envelope:
Felt
Embroidery Floss
Pins
Buttons
Scissors
Envelope Template
Glue (of choice) or Glue Gun
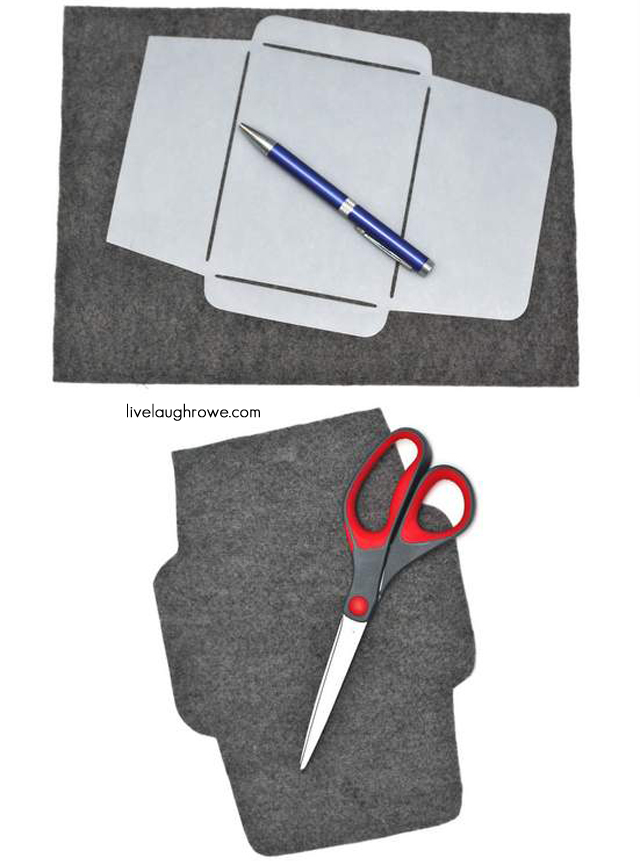
Step One: Do you have an envelope template? If not, maybe you have an extra envelope lying around that you can disassemble and use it as your template. Once you have that ready, let’s trace and cut.
 Step Two: Fold in the lip on one side and then fold the larger flap over and pin. Repeat on the other side. At this point, you could iron down your creases, or you can wait till after your gluing is done. Totally up to you! You will definitely want to iron the creases down at some point.
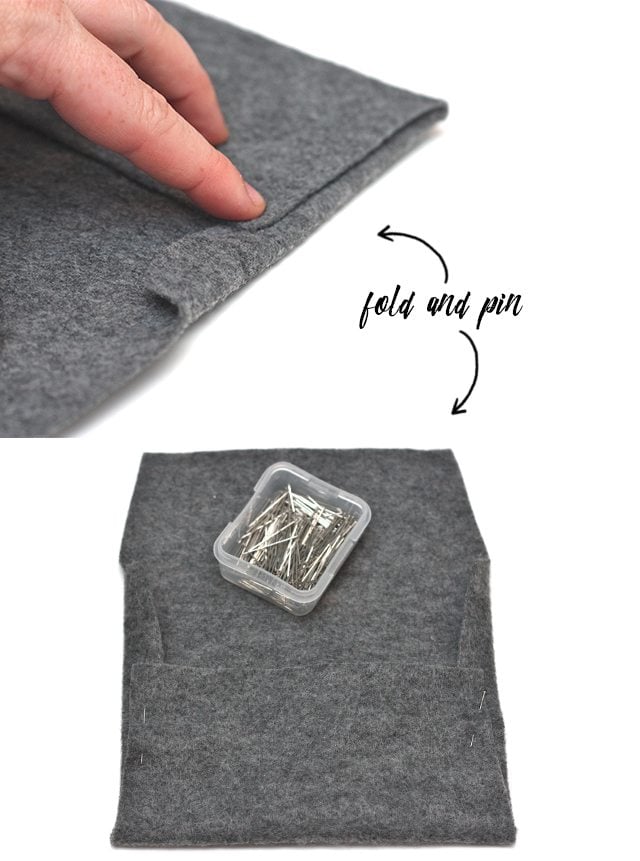 Step Three: Seal your folds. However you choose to seal each fold is up to you — fabric glue, glue gun, stitch, etc. I chose the hot glue gun {a crafty girls best friend}!
 Once you’ve glued the envelope closed — sew on a couple of buttons with your embroidery floss. After I finished sewing on my second button, I stitched a knot, then pulled the needle through between the button and the felt (not through a hole), so that it was still attached and could be used to wrap around the buttons for closure. It was practically impossible to capture that on camera, so I hope that makes sense. Once you’ve sewn on the buttons and your extra embroidery floss is in place for using as a closure, you’re DONE! Yay!
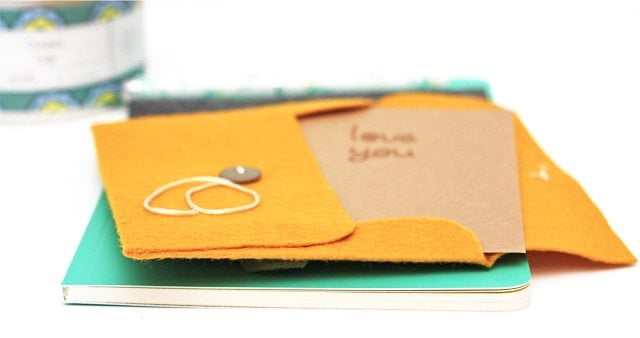
...and the sky is the limit. Use for {love} notes.
Gift a lovely piece of jewelry.
Embellish the front with rolled flowers.
Make them bigger or smaller and have fun!
 Be sure to visit with me here too:
Facebook | Instagram | Pinterest | Twitter |Google+


Karen at Little Red House Designs says
Great idea! I have many of those templates from scrapbooking – never thought to apply fabric to them!
Kelly says
YAY! Happy crafting, Karen 🙂 Hugs.
Danni Baird says
Kelly those are just plain fun! I have never made an envelope, but I might try yours!
Kelly says
Thanks so much, Danni! I hope you do try making these — they’re darling 🙂 Hugs!
amy says
I really really love these. I’m already thinking about what I could use these for come Christmas time.
Kelly says
YAY! So glad you like these cuties 🙂 You’re right — they will be fabulous to have, make or use around the holidays! Have a lovely week. xo, Kelly
Lizy b says
I love felt projects!! The grey envelope is my favorite!
Kelly says
Hi Liz! I love felt projects too 🙂 Thanks for stopping by. Hugs!
Kristine says
What a fun and personalized idea! LOVE IT! Great tutorial.
Kelly says
Thanks so much, Kristine! Hugs!!
Melanie says
Very sweet idea, thanks for sharing!
Kelly says
Thanks so much, Melanie 🙂 Have a lovely week.. xo, Kelly
Kristy says
What fun these would be!! Great idea!!
Kelly says
Thanks so much, Kristy! They’re super fun and easy. Hugs!
brittany says
O.M.G i love this tutprial! those envelopes are so cute! i want to make them now!! a trip to michael’s is in order this summer!! i love writing letters and notes so this a cute way to give to someone 🙂
Kelly says
Hi Brittany! YAY. I’m so glad you like my tutorial 🙂 Happy Crafting. Hugs.
kara says
Neat idea!
Kelly says
Thanks so much, Kara 🙂
Cari says
This is adorable!! I think my little one would love some for “her mailbox”!! Thanks so much for sharing!
Kelly says
Thanks, Cari! Oh my gosh — how cute would that be for your little one 🙂 Love it!!
Emi says
Wow, so simple and so practical! I love felt projects and I’m a button collector – yap, I’m going to have fun trying out lots of colour combinations! Thank you so much for sharing the great tutorial 🙂
Kelly says
So glad you like these felt cuties 🙂 Have fun… the skies the limit. Hugs.
Just Jaime says
Really cute! I think they would be perfect for Valentine’s day!
Kelly says
Yes, they would be perfect for Valentine’s Day 🙂 Thanks so much for stopping by!
michelle says
these are such a great idea, they’re cute and perfect for gifts plus they’re reusable!!
i would love for you to link up with Get Your Craft On at the Gilded hare:
http://thegildedhare.blogspot.com/2012/06/get-your-craft-on_24.html
Kelly says
Thanks so much, Michelle! Reusable and Versatile. YAY! Have a fabulous day 🙂
crystal says
I love this! Love working with felt also. 🙂
Kelly says
YAY! Felt is fabulous, Crystal. Thanks so much for stopping by 🙂
Lindy @Itsy Bitsy Paper says
This is awesome! Oh my gosh I have to make some of these for my cards. Thank you for the great tutorial.
http://www.itsybitsypaperblog.com
Kelly says
Thanks so much for loving on my felt envelope tutorial, Lindy! Have a fabulous weekend 🙂
Amy Nicole says
You married my two favorite things.. fabric + stationary! So cute!
~Amy
http://www.LadyMockingbird.com
Kelly says
I love it! Thanks so much for stopping by, Amy! I hope you’re having a fabulous day 🙂 Hugs.
Shannah @ Just Us Four says
Thanks for the easy to follow tutorial! You make it look so easy to make 🙂
Kelly says
Thanks so much for stopping by, Shannah! It is a pretty easy and fun project. Happy crafting 🙂
Jewelry Rage says
Really cool. I love working with felt!
Kelly says
ME TOO! And I love the versatility of this easy project 🙂 Thanks for stopping by. Hugs!
Jaime ♥ Raising up Rubies says
thank you for sharing…these are very sweet!
♥ much love
Kelly says
Thanks so much, Jaime 🙂 A super simple and sweet project. Hugs.
Jessi says
Wow, what a brilliant idea! I love working with felt too, and I have a bunch leftover from making a bunch of coffee cozies, so I’ve got to give this a try! I’d be thrilled if you’d share these at my current link party so everyone can see how adorable they are! http://practicallyfunctional.net/2012/06/the-fun-in-functional-link-party-5/
Kelly says
Hi Jessi! Thanks so much. I linked up to your party 🙂 Have a fabulous week! xo
Katherines corner says
What a great project sweetie. This is something I can do with our grandchildren! Thank you for sharing at the Thursday Favorite Things Blog Hop Linky Party. I hope you have a wonderful weekend xo P.S. I’m having a party at Katherines Corner today and you are invited!
Kelly says
Yay! So glad you like this easy and fun project… still hard to believe you’re a grandma. You look too young 😉 Have a fabulous week!!
Charlie says
These envelopes are so sweet! I just love them — thanks SO much for the tutorial! I want them in every color and different sizes 🙂 Visiting from Tatertots & Jello!
Charlie @ Match Made On Hudson
Kelly says
Thanks so much for visiting with me, Charlie!! They are a super easy project — and the skies the limit 🙂 Have fun…and don’t be a stranger around here!! Hugs.
Lauryn says
cute kelly! i love it!
Kelly says
Thanks, Lauryn! I hope you’re having a fabulous week 🙂
louise says
This is so cute! I wonder if you could actually mail them?? I bet you could! You might need a different closure to send in real mail though. I want to try it!
Kelly says
Excellent question, Louise 🙂 You’ll have to keep me posted on that! Thanks so much for loving on my fun little project. Have a fantastic week. Hugs!!
Sofia says
Were you actually able to mail these? I am very interested in what you did!
Thanks!
Sofia
Kelly Rowe says
Hi Sofia! I didn’t actually mail it. I used it for cards and gifts 🙂
freckled laundry says
These are darling, Kelly!
Kelly says
Thanks so much!!
Diana Meredith says
This is so cool! Love this idea. These would be great for small gifts for birthdays or Christmas. Thanks so much for sharing!
Kelly says
Hi Diana! Thanks so much… I’m so glad to hear you love this super fun and sweet project. Have a fabulous week.
Christine says
Yay Kelly!!! You are using my favorite sewing tool…. the glue gun!! haha!! LOVE the envelope!!
Thanks so much for sharing this at The DIY Dreamer.. From Dream To Reality! Don’t forget to swing by this evening.. I can’t wait to see what you link up! 🙂
Ginger says
Featuring you today! 🙂
Ginger @ Ginger Snap Crafts
http://www.gingersnapcrafts.com/2012/07/take-look-at-you-my-favorites.html
Stephanie says
Love this idea! I just pinned it!
The Sisters says
These are so cute!! Thanks for linking up to “Strut Your Stuff Saturday!” Hopefully we’ll see you tomorrow at 8pm MDT for this week’s party! 🙂 -The Sisters
Lauren says
These are great! Felt is my new thing now. Love it!
Thank you for linking up to our Pinteresting Party.
Angie R says
oh that is fabulous! Featuring your project today 😉