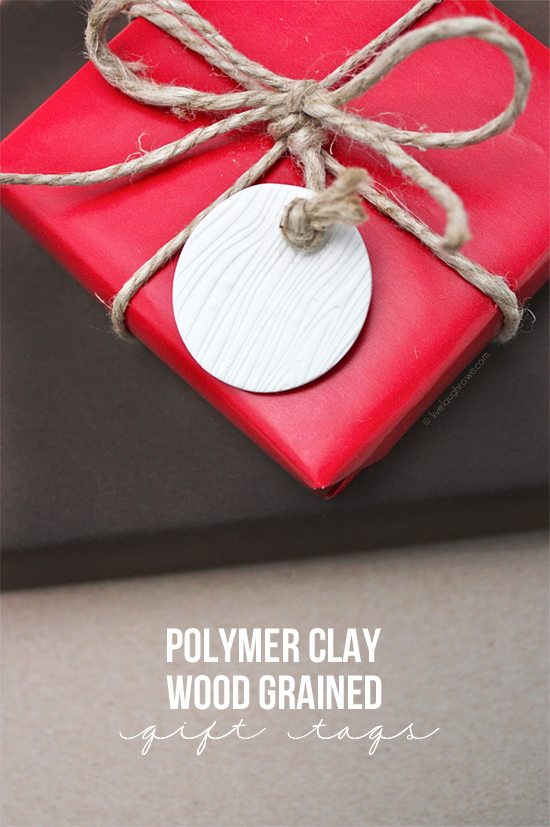
Something I truly enjoy about the Christmas holiday is wrapping gifts and all the fun you can have embellishing them. Today in the 12 Days of Holiday Fun, I thought I’d share a fun tutorial for wood grained Polymer Clay Gift Tags. I have to admit that I’m in {love} with the possibilities! You can do so many incredible things with polymer clay! Shall we begin? {eeks!}
SUPPLIES for Polymer Clay Gift Tags:
Biscuit Cutters
Clay Roller
Polymer Clay
Wood Grained Stamp
(or stamps of choice)
 Once you soften your polymer clay a bit, you’ll want to lay down something that will protect your table or counter top. Recommended uses include parchment paper or wax paper. I used parchment paper — so I could go from counter to oven. Easy breezy! Now lets roll our the clay.
 Using the clay roller, you’ll roll out the clay to be as thin or thick as you’d like. 1/4″ seems to be the average. Once you’ve rolled it to your preference, take the wood grained stamp and place it on top of the clay and press down firmly. I bought my stamp on Amazon and I {love} it. It has so many fabulous uses. Anywho, the clay may stick to the stamp, but no worries — gently peel it off and place back on the parchment paper.
 Here you can see the wood grain imprinted on the polymer clay.
 Now we’ll use the biscuit cutter to cut out out the round tags. Mine was 1-1/2″ in diameter.
 You’ll want to use a toothpick or skewer to pierce holes at the top of the soon to be tag, moving it around to enlarge the hole until it’s large enough to thread your ribbon, twine or string of choices through. Slide the parchment paper onto a baking sheet and bake according to your clay directions. Remove from oven and cool.
Loop your string, ribbon or twine through the hole and embellish your gift — or you might even add one to your tree!
 Pretty fabulous, right? And these could be used year round…
I {love} that they’re durable with a contemporary rustic vibe.
Ho-Ho-Ho! Happy Crafting!
Subscribe to Updates | Like on Facebook | Follow on Pinterest


nest of posies says
how creative is this! wow! i love the wood grain effect.
Kelly says
THANK YOU!!! I {love} these. Super easy too. Have a fabulous week. xo
Mary@athomeonthebay says
Those are really cool tags, Kelly.
Kelly says
Thanks so much, Mary! Super easy and fun to make too. Have a fabulous week. Hugs!!
Holly and Nat @ My Sister's Suitcase says
These are awesome Kelly!! Wow, I never would have thought to use a stamp that way… I am in love with faux bois right now, these are just so chic! I got the most darling red and white wood grain wrapping paper at Target today! Now I just need some of your tags 🙂
Kelly says
THANK YOU!!! Gotta love wood grain everything and anything, right? Happy Wrapping and Embellishing! Hugs.
April says
What a great craft idea! I even have that stamp, time to pick up some clay, what a great idea for a gift tag! Thanks for the tutorial. 🙂
Kelly says
Yay! How exciting that you already have the stamp! Thanks for stopping by. Happy Crafting!
Emily says
Love these!! I’m so putting them on my to-do list! I love faux bois so much right now!
I’ve shared on my FB page and pinned!
Kelly says
YAY! I’m so glad you like my project. Thanks for stopping by –and– for sharing! Hugs.
Jessica @ Dear Emmeline says
LOVE, Love, love these! so adorable!
Kelly says
Thanks so much, Jessica! I kinda {love} them myself. Have a fabulous week!
Jenn @ My Fabuless Life says
I am OBSESSED with these. The end.
Kelly says
Thank you so much, Jenn 🙂 You ROCK! Hugs.
Shaina says
This is just fabulous!
Kelly says
Thanks, Shaina! I truly appreciate you stopping by.
palak says
How cute! This ould be perfect for our secret santa exchange. Do you know how many tags can you get out of one 2 oz package?
Kelly says
Hello there! I don’t know how many tags you would get out of a 2 oz. package. That would vary on how thick you make your tags, etc. Thanks so much for stopping by. Happy crafting!
Shari @ Turnstyle Vogue says
Although I’m certainly no Polymer pro, I enjoy working with it as well. I think these are beautiful. I was planning on doing clay tags for gifts this year, but never thought of something cool like this. Pinning….and doing! 🙂
Kelly says
This was my first polymer project and I {loved} it! I’m fairly certain I’ll be having some more fun with it. Happy Crafting, Shari!
Gina says
Awesome- my kids would love this project.
Kelly says
Thanks, Gina! The skies the limit for the kiddos.
Julia @ FaveCrafts says
What a cute project! I love it so much that I decided to feature it in our roundup of homemade gift tags! Check it out here: http://www.favecraftsblog.com/homemade-gift-tags/
Kelly says
THANKS so much, Julia!… for loving on my project and FEATURING it in your roundup 🙂 Have a fabulous week.
Kim@ Too Much Time says
Kelly, you did awesome girl! I LOVE these tags. I haven’t worked with polymer clay before, but I may need to try! If you have a sec this weekend, I would love for you to share at Get Schooled Saturday! http://too-much-time.com/2012/11/get-schooled-saturday-50.html
xxx
Kim @ Too Much Time On My Hands
Kelly says
Hi Kim! Thanks so much. I stopped by 🙂 Have a great week.. Hugs.
crystal says
I’ve always wanted to make necklaces like this! I love how the wood grain looks against the white clay. Cute, cute project my friend!
Kelly says
Awww. Thanks so much, Crystal! I appreciate you stopping by. Have a fabulous week, friend. Hugs.
Angie R. says
Okay, this is probably a ridiculous question for you crafting experts, but I am a crafting wannabe and not that knowledge of these things. How do you write on the tags, or what type of writing utensil would work best for that purpose?
Simplicity Interrupted says
i LOVE these … making a note for next year. thank you for sharing!
Dom says
oh my wow!
These are so many different kinds of awesome!
Great work! 🙂
Sharing these for sure.
Dom.
Kelly says
Thanks so much for stopping by and loving on my project! Merry Christmas. xo, Kelly
momprojects says
These are so unique, you could literally use any kind of stamp! I love projects that are easily customizable, and I love gift wrapping even more! I will absolutely pin this onto my gift wrapping board. Thanks for the great idea and the specific directions, I love it!!
Jamie @ Love Bakes Good Cakes says
I am seriously the most un-crafty person I know – and this is so simple and clever! I love this, Kelly! Pinning 🙂 Thanks so much for linking up to Freedom Fridays last week! We hope you’ll join us again tonight when the party goes live! {hugs}
Fluffy says
Very good idea; I like the wood grain pattern. What do you use to write on them with and can they be cleaned and reused? If so, I can imagine these being exchanged between my family for years to come!